At this time, the CNC machines at the enterprises, in the greater parts are in poor condition for the following reasons:
1.Are in a failed state of the NC system or missing media
programs, if the surviving mechanics of the machines.
2.Obsolete CNC system that does not meet modern
requirements for accuracy and reliability .
3.Weak matimatika NC system.
4.Standard legacy nodes and arghata installed on the equipment.
5.The complexity of machining parts of complex shape.
6.The difficulty in finding replacement parts,or expensive cost of their individual production.
on the Basis of the modern development of production and of the reasons mentioned above, we can conclude that it is necessary to update Park of machines. Today, the market represented a huge number of machines for different countries and firms, performing various multi-purpose tasks and provide
excellent quality and precision machined parts in various fields of engineering. This equipment(machining centers) has quite a high cost, but they allow you to expand the nomenclature of the handled details of the company and with the full and proper utilization of equipment to pay for itself in a fairly speedy timeframe. Also the human factor to reduce to zero, apply robots manipulators with different layouts and different load capacity which allow to provide loading/unloading, installation, and removal of parts from equipment. This equipment formed of flexible manufacturing
system (SBS),which includes two machines of the firm reading LS-400,MB Reading-46) and the robot manipulator firms Kawasaki(model RS10N). Modern GPS is an ideal solution for automating medium volume and piece production.
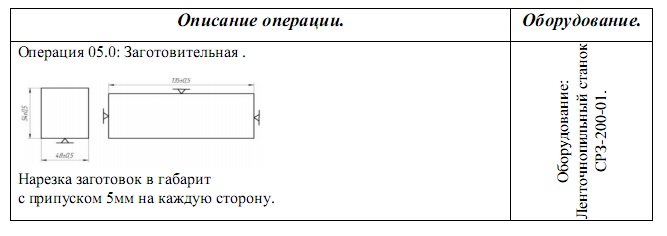
In the existing technological process it is necessary to pay great attention to precision installation and deployment details, as the item must be reinstalled for each setup. A lot of support time is used for binding parts as well as replacement and binding instrument based on the technical capabilities of the equipment. Used cutting tool brand Р6М2 does not allow to use a high processing speed.
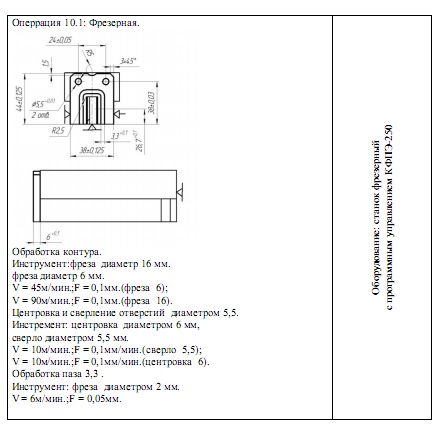
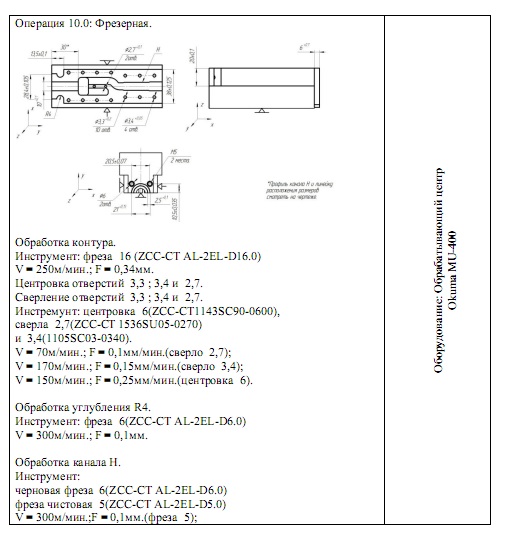
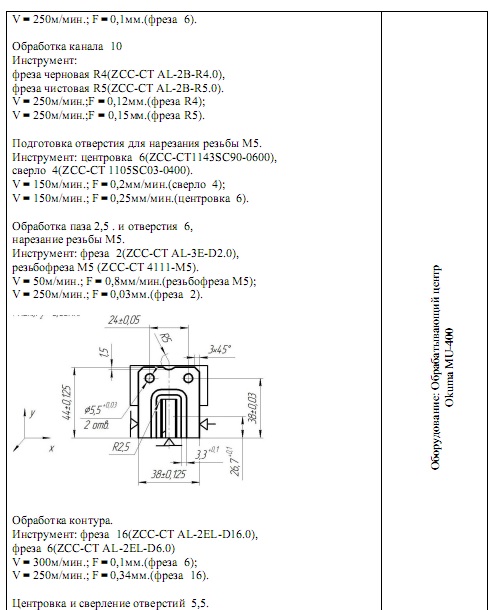
In the proposed process reduced the complexity by combining multiple operations into one. More accurate positioning of the surfaces and reducing the error-based, is achieved by reducing the number of permutations and a sufficient number of places for cutting
< span style=»font-family: Verdana, Geneva; font-size: small;»>tool in the tool magazine of the machine,which significantly reduces installation time and install the cutting tool on the old equipment.Also was picked up by an analogue of the imported cutting tools
special series for aluminum using high-speed machining, because of the special geometric shape is a good chip removal from the treatment zone and achieves high accuracy and surface quality of the workpiece.
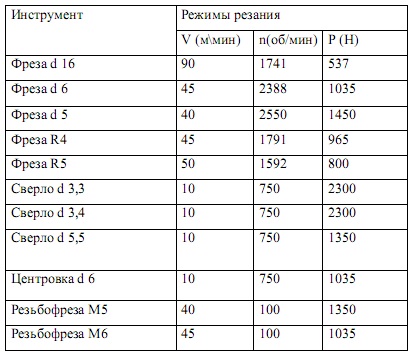
The Calculation of cutting conditions for the process for the manufacture of the part
the purpose of cutting elements take into account the nature of the processing, the type and size of tool, material cutting, material and condition of the workpiece, the type and condition of equipment.
Processed billet of alloy) V95 GOST 4784-97 , tool material – high speed steel R6M5.
< / span>
In the existing technological process must be given bolshevskaya precision installation and deployment details, as the item must be reinstalled for each setup. A lot of support time is used for binding parts as well as replacement and binding instrument based on the technical capabilities of the equipment. Used cutting tool brand Р6М2 does not allow to use a high processing speed.
the OFFERED TECHNOLOGICAL PROCESS
In the proposed process reduced the complexity by combining multiple operations into one. More accurate positioning of the surfaces and reducing the error-based, is achieved by reducing the number of the reinstallation, and a sufficient number of seats under cutting the tool in the tool magazine of the machine, which significantly reduces setup time and installation of the cutting tool on the old equipment. Also was picked up by an analogue of the imported cutting tools special series for aluminum use fucking high-speed machining, because of the special geometric shape is a good chip removal from the treatment zone and achieves high accuracy and surface quality of the workpiece.
the control program for manufacturing the part
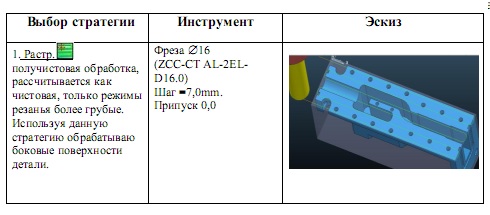
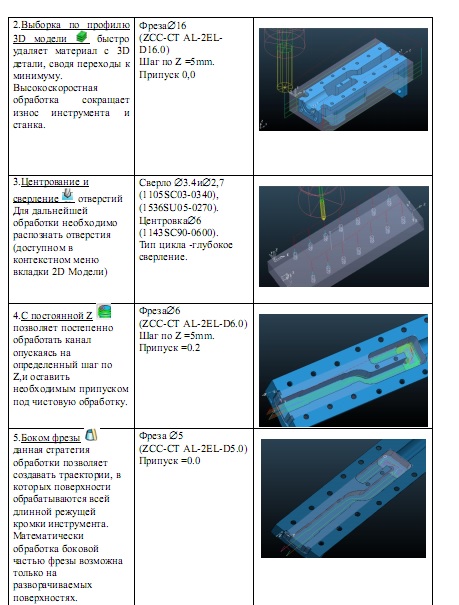
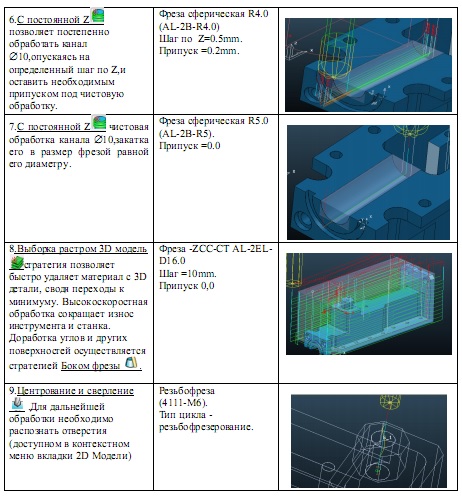
the Availability of high-tech Metalworking equipment requires appropriate software for the development of highly effective control programs. Package PоwerMill for each surface model was calculated trajectory processing and select the corresponding cutting tool.
semi-finishing processing, in the preparation of ck was calculated as the finishing, just cutting more gross. Using this strategy the surface treated side of the part.
and here is the control program for CNC machine
N16 T16M6
S6593M3
G15H1
G0 X12.5 Y-40.3
G56 Z54.0 H16
Z49.0 M8
G1 Z45.5 F4452
X-137.5 F2528
G2 G17 X-Y 144.6-33.2 I
X-137.5 Y-26.1 I7.1
G1 X12.5
X19 G3.6 Y-19.0 J7.1
——
X-Y 114.38-33.11
X-114.89 Y 32.13
X-Y 115.07-31.0
X-115.15 Y-29.86
X-115.36 Y 29.65
X-115.64
X-115.91 Y-30.0
X-115.92 Y-33.2
X-115.95 Y-37.2
G0 Z54.0
M9
where , T16-team selection tool from the tool magazine with a numeric value entered after the address «T».
M 6-command tool change.
M 3-command start spindle rotation in a clockwise direction.
G 56 H16 — correction of the tool length z
N-number of correction on the tool in the offset table of the machine.
15 G N-1 the choice of the coordinate system of the workpiece. When you execute this frame, the machine control moves from the machine
SC in the local SK.
S1500 is a function of the spindle specifies the spindle speed with a numeric value entered after the address «S».
G 0 is the accelerated move, or positioning necessary for rapid movement of the cutting tool to position a processing or safe position.
G 1 -linear interpolation.
After processing the frame containing this code,all the moving units of the machine takes place with a given feed F.
M 8 — turn on the main cooling.
M 9-shutdown cooling.
With the help of CAD — systems SоlidWоrks model has been developed. This
the system allows to model different complexity, solid models and make necessary Assembly.
With the help of CAM system Pоwer Mill was developed the control program for the modern equipment, the strategy presented in this
CAM system can process parts of varying complexity and obtain better value from its production by reducing the complexity of the workpiece.
the Selected tool ZCC-CT, considered the grades and tool geometries. This producer has a relatively low cost and good strength of the cutting tool. In ratio price-quality is the best choice.


